
How can we help?
-
Asset
-
-
- Articles coming soon
-
- Articles coming soon
-
Facilities
-
Failures
-
- Articles coming soon
-
-
Group
-
Help
-
- Articles coming soon
-
- Articles coming soon
-
- Articles coming soon
-
- Articles coming soon
- Articles coming soon
-
-
Main Client Window
-
- Articles coming soon
-
- Articles coming soon
-
- Articles coming soon
-
- Articles coming soon
-
-
Scoreboard
-
- Articles coming soon
-
- Articles coming soon
-
- Articles coming soon
-
- Articles coming soon
-
-
Tools
-
-
- Articles coming soon
-
-
Window
-
- Articles coming soon
-
- Articles coming soon
-
- Articles coming soon
- Articles coming soon
-
Register Panel Screen
Posted
Updated
ByTheta Team
Print Objective:
Explain what a user is seeing on the Register Panel Screen.
Rights Needed:
☐Admin ☐ Admin Lite ☐Well Admin ☐Well Control
☐Well Config ☐Well Config Lite ☒Read Only
Versions:
XSPOC: 3.1, 3.2
Purpose:
The Register Panel Screen allows the user to scan registers in the device individually or in groups, as well as create standard register groups that a user may want to scan frequently for a specific purpose.
Instruction:

- Open XPOC Client
- From the navigation panel locate and select the Asset Tab
- Click Asset>Register Panel
- The Register Panel Screen opens and contains the following:
- Two tabs along the top left of the screen
- Registers – displays the registers that a user selects to scan along with their values if the scan is successful.
- Logs – displays event logs if one of the logs is selected to scan. This works only for Lufkin SAM controllers currently.
- There are two filters near the top left-hand side of the screen
- Register Groups – allows the user to select specific groups of registers created to scan as needed
- Registers – a list of every address in tblParameters by POCType
- Address bar along the bottom left – displays addresses being scanned, as well as allows the user to manually enter addresses here to be scanned
- Read and Write buttons toward the bottom left-hand side of the screen
- Just below the Read and Write buttons are two other options
- Continuous Read – sets a continuous read of the addresses selected
- Interval- set a red interval at the desired setting.
- On the bottom right there are two window control icons.
- The lock icon allows the user to lock the screen,
- The arrow icon allows the use to float the window and move it to other screens or areas of the same computer screen.
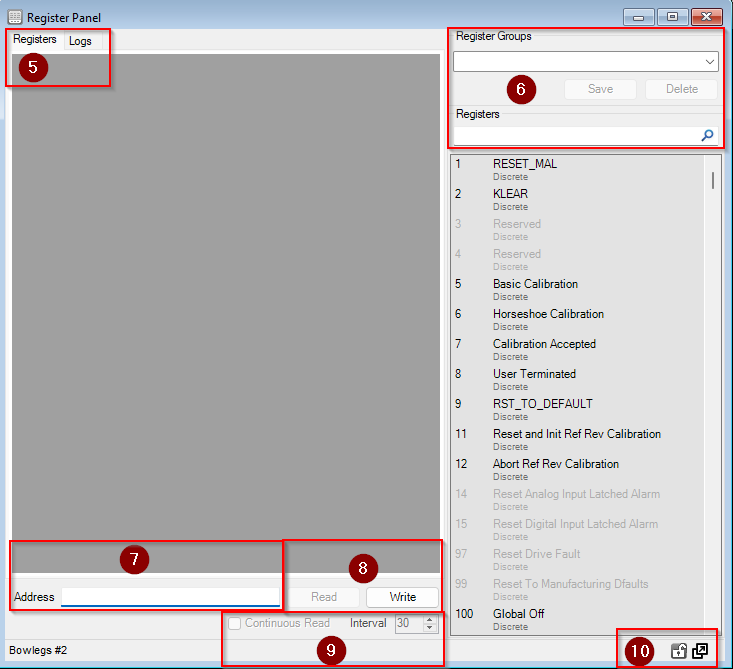
Table of Contents